Inserting Clip Art or Objects
Zoho
Show has a fantastic gallery of objects and clip art that feature a
range of cool graphics from signs and symbols to colorful images of
fruits, animals and more!
-
Click on the relevant category. For clip art images, use the drop down menu.

-
Browse through the rich gallery and pick out a relevant image.
-
Drag and drop the object or clip art image onto the slide.
-
When
the object or clip art image is inserted on the slide, it appears
selected by default.
This is indicated by the colored dot and squares
around it.

-
Drag the orange circle on the top to change its orientation.
-
Drag the blue square in the corner to alter its size.
-
Use the yellow squares on the four sides to stretch it in that respective direction.
-
You
can also alter the object or clip art image to suit your taste.
To view
your options, right click on the object or clip art image.
-
Add text : Allows you to enter text on the object.
-
Bring to front : When more than two objects are placed for an effect,
use this option to bring the desired object one level forward.
-
Bring forward : Bring the desired object right up to the front.
-
Send to back : Send the desired object one level backward.
-
Send backward : Send the desired object all the way back!
The example below should help you understand better.
Now this is the original sequence of objects:

Using any of the options above, these are the results :
-
Bring to front (diamond from original position) :

ii. Bring forward (diamond from original position):

-
Send to back (diamond from position ii):

-
Send backward (diamond from position ii):

You can also cut, copy, paste, delete or deselect a specific object using the respective options from the pop-up menu.
-
A
right click on an inserted object (Or press P on your keyboard) also
throws up another interesting option – properties.
This allows you to
customize an object in the following ways:
-
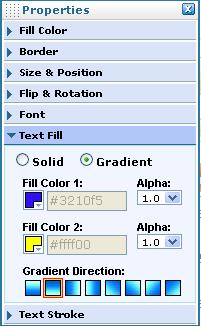
Fill color : Choose from solid or gradient colors and also set the transparency of the object.
Preset gradients are also available.
-
Border : Define the thickness, style, color and transparency of the object’s border lines.
-
Size & position : Specify the width, height and orientation of the object.
-
Flip & rotation : Flip the object horizontally or vertically. Or choose to rotate it.
-
Shape’s font : If you’ve entered a text on the object, you can customize the font, style, size and weight.
-
Text fill : Choose between solid and gradient colors for the text.
-
Text stroke : Define the thickness and color of the text stroke.
-
A right click on an inserted clip art image allows you to customize the following parameters :
-
Size and position : Specify the width, height and orientation of the image.
-
Flip and rotation : Flip the image horizontally or vertically. Or choose to rotate it.
-
Shape’s font : If you’ve entered a text on the clip art image, you can customize the font, style, size and weight.
-
Text fill : Choose between solid and gradient colors for the text.
-
Text stroke : Define the thickness and color of the text stroke.
-
Similarly, a right click on a text box allows you to customize the following properties :
-
Color : Change the background color of the text box and the text.
-
Font : Change the font, style, size, weight and variant.
-
Box size and position : Specify the position and size of the text box.
-
Padding : Specify the space between the four sides of the text and the text box.
-
Text spacing : Stipulate the space between words, letters as well as the text alignment.
Now work your magic and create a stunning presentation...


 Uploading ....
